3. Preparing messages
3.2. Despatch advices
Delivery Notes screen allows you to prepare electronic delivery notes for received messages, and consists of three main parts: Delivery Note Status, Delivery Note Details, and New Delivery Note.
3.2.1. Pictures of Prepared and Draft Despatch Advice:
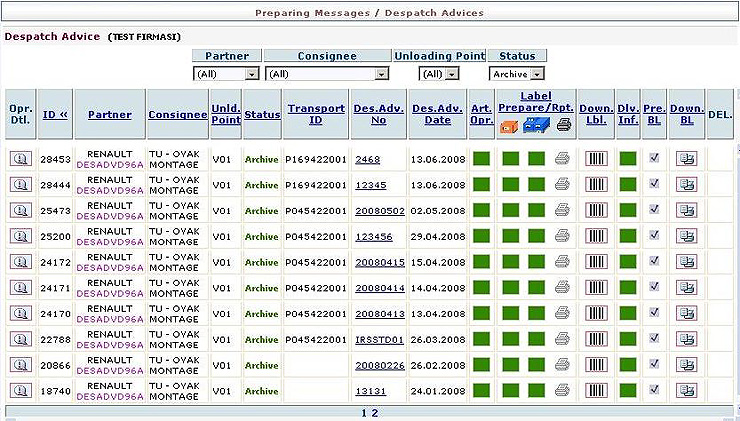
At delivery notes screen, status of previously prepared delivery notes can be checked. Draft Delivery Notes are kept at New, and Prepared Delivery Notes are kept at Archive.
Delivery Note area consists of ID, Partner, Consignee, Unloading Point, Transport ID, Despatch Advice Number, Despatch Advice Date, Article Selection parts.

Green boxes mean that article selection is already completed. In order to add a new article, please click on the box.
Red boxes mean that operations within the areas are not done yet.
3.2.2. Preparing New Shipment:
New Despatch Advice screen is as shown below:
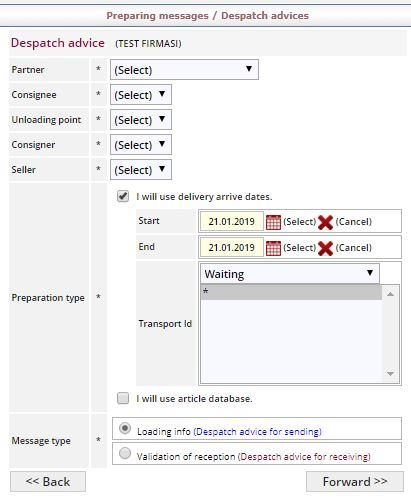
At New Despatch Advice screen, user can create a new delivery note by selecting either ‘I will use delivery dates’ or ‘I will use article database’ options.
In the case of the first option selected, messages can be searched according to date of receivement. And in second case, all received messages are listed.
As Partner, Consignee, Unloading Point, Consigner, Preparation Type and Message Type options are set, you may click on ‘Next’ button to pass on the Delivery Note Preparation page.
Message preparation and despatch advice information screens are as shown below:
Next to the title ‘Despatch Advice’, the informations like Despatch Advice Sender (company), Consignee, Factory, and Consigner are indicated.
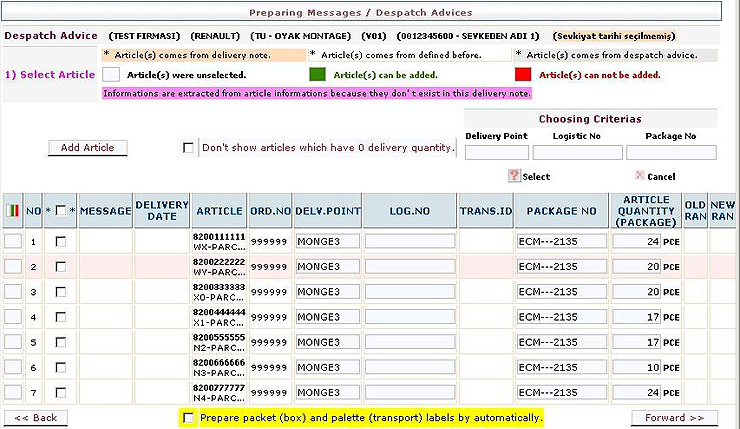
By clicking on ‘Add article’ button, new articles can be added on the new delivery note list.
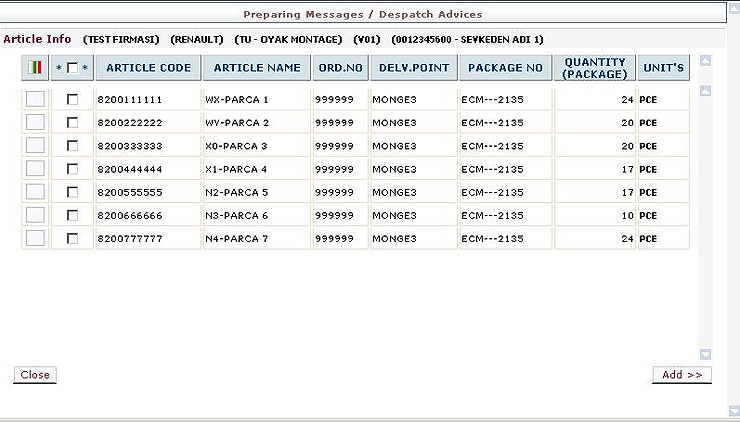
NOTE: To know more about adding articles to database please check the articles section.
After choosing articles, please click on the ‘add’ button.
Added articles appear at Delivery Note Preparation screen. After entering number of articles to be sent in related textboxes, please click on ‘forward’.
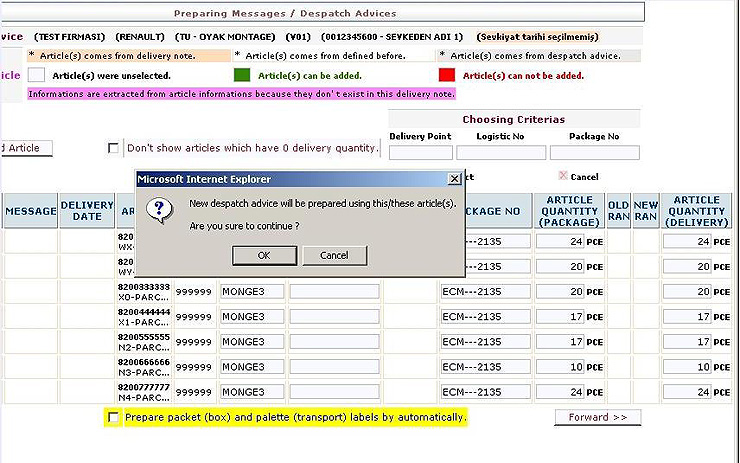
As ‘sent’ button is clicked, a warning message displayed above appears on the screen. Please click on OK to continue.
Prepared Despatch Advice appears at Despatch Advice Preparation screen.
3.2.3. Adding Article:
To see the prepared delivery note, please click on the box below ‘Article Selection’
Delivery places displayed on this page are the ones previously created by user. To add a new delivery point, please check unloading points.
To add a new article, please click on ‘Add Article’.
The screen is as shown below:

NOTE: Article codes seen above are the values entered earlier at ‘Company Database / Articles (seller)’ area. To send articles, please select articles by clicking on checkboxes, and then click on ‘Send’.
As clicked on ‘send’, a warning message will appear on the screen. If you labeled articles before, these will be deleted.
3.2.4. Preparing Package (box) Label:
Red boxes below ‘Prepare label’ mean that packages and package labels are not prepared yet. In order to prepare labels, please click on Red box below ‘Package (Box) Label Preparation’. The screen is as shown below:

To prepare packet labels automatically, please click on ‘Prepare Automatic Labels’.
To prepare packet labels manually, please enter number of labels in ‘Packet (box) Labels’ box, and click on ‘Send’.
In case article codes and order numbers are the same, colors below Number Area will also be same. If not, this area will consist of different colors.
In case article numbers are entered manually, and a number is not entered, user is warned by a message.
When the user clicks on ‘Automatic Label Preparation’, a message box will appear on the screen, indicating that your previously linked label information will be lost, and this new information will be used.
To prepare labels automatically, please click on ‘OK’.
3.2.5. Preparing pallet label:
After packet labels are created, pallet labels can be prepared either automatically or manually.
Pallet labels screen is as shown below:
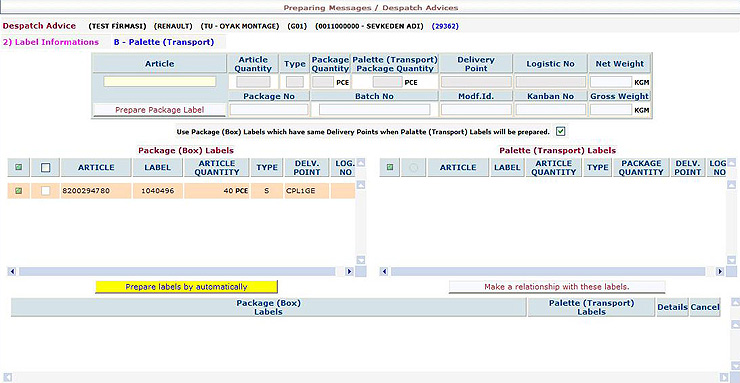
On left side, the prepared package labels take place.
‘Prepare labels by automatically’ button matches package labels with pallet labels automatically. In case you wish to match the labels manually, please select related package labels on the left side, and then check the corresponding circle on the right side. To complete pallet label preparation, click on ‘Make a relationship with these labels’, and then on ‘Send’ button.
After completion of pallet label, the screen shown below will appear. By holding the mouse pointer on a ‘detail’ box, the corresponding item’s Article Code, Article Amount, Package Type, and Package Amount created by matching process can be monitored.
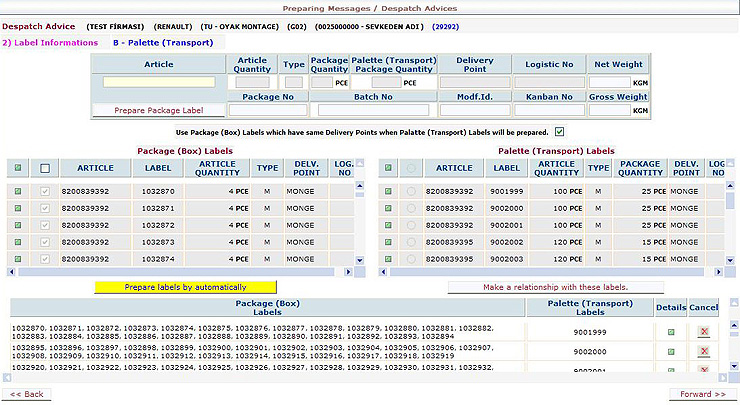
After pallet labels are created, pallet label box on the Despatch Advice Details screen will turn into green.
3.2.6. Shipment Details Screen:
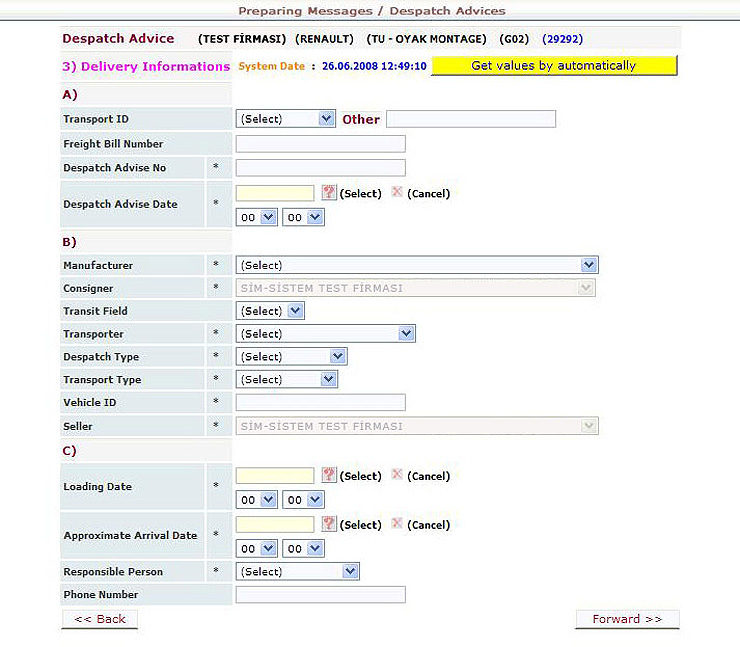
At shipment details screen, Shipment Details of prepared pallet and package labels are entered. In the first part, Transport ID is created.
In the second part, Manufacturers are defined. Values in this part are those previously defined by user.
NOTE: To define manufacturer, please check defining manufacturer.
Screen appears as shown below. (Sign * signifies obligatory areas to be filled in.)
3.2.7. Preparing BL papers
BL’s are lists of all delivery note details, given to transporter. When you click on BL button, download page will appear on the screen. To save BL paper on the computer please click on the ‘Save’ button. This sheet should be given to the Transporter.